Wednesday 31 July 2013

littletree bakes...birthday cake!

photo by littletree designs


So I promised a cake picture and here it is! After much deliberation I have baked this gorgeous, sticky Banana Maple cake...and it is scrumptious. Apologies for the quick instagram picture, I didn't have time for a proper camera shot so this is what it should look like all styled and photographed professionally...


recipe and source HERE

The way you arrange the bananas make the cake look so pretty...I followed the instrutions to the letter apart from I added a few chopped walnuts to the base and I added the extra maple syrup over the top after I had turned it out. But other than that it is a darn good recipe! Happy baking! xx


 ps - it's my birthday today!

***

Monday 29 July 2013

a huge apology and some stuff about cake...

from my board Words and more... // cannot find source so let me know if you do!


So...here I am again apologising for being such a poor blogger recently. The reasons I haven't been around are many...one being the gorgeous weather here at the moment, in fact it's been too hot even for a cold morsel like me! Two, work...boring...and three we have decided to start tackling the two most challenging rooms in the house to decorate at once, the kitchen and the hallway. So we've been pretty busy!

Plus...it's my birthday this week. Now I'm not a huge birthday celebrator but this year I'm off to Jamies Italian in Cambridge which I am super excited about! If you're a foodie then hop on over to have a good drool at the menu...but a birthday does mean cake! And that is something I can definitely get excited about...but the question is what cake? Chocolate, lemon, fruity...ooh decisions decisions...I'm off to browse the books and of course the neverending source of web inspiration that is Pinterest!

I hope you all have a lovely week and I promise to be back with pictures of the cake and of course the meal!x


***


Friday 12 July 2013

pinterest pick of the week...

image via Love Audrey // pinned to my board Words and More...


When I saw this quote over on beautiful blog Love Audrey I knew it was going to be my pinterest pick for this week...it sums up my feelings about books perfectly. I love how a book can transport you to another world, time, place...and that is exactly how I have been feeling this week reading The Help by Katheryn Stockett. What was a little strange was that Audrey had also recommended The Help  in her reading list...small world isn't it?

I'm sure most of you know of the story especially since the film adaptation came out...the tale of a small Mississippi town during 60's America that explores the racial divide that was so strong there at the time, all through the lives of three women, Aibileen, Minny and Skeeter. Now I really enjoyed the film, and it is what lead me to read the book, but I'm finding the book so much better! Either way I would definitely recommend the film or book version...

I hope you have a lovely weekend, it is meant to be an absolute scorcher here in the uk! So I will be in the garden with a cold drink and book in hand to be sure...enjoy! x


from my board Words and More...


ps - how often does this happen to you after reading a brilliant book!?


***

Thursday 11 July 2013

life recently via instagram...

...lovely shot of Nala...
...a big box of glorious summer strawberries...
...making homemade sausage rolls and cheesy pinwheels...
...a day a the beach, starts out bad...
...but ends up lovely and sunny...


Sorry I haven't been around much this week but I have been incredibly lucky and had the best week off work (weather-wise) and have been making the most of it, reading, baking and even a trip to the beach! How pretty are these pastel coloured beach huts at Measea Island? Hope you've been enjoying the weather where you are...x


*** 

Monday 8 July 2013

littletree bakes...rocky road


Hellooo monday! And what a way to start the week...with a completely awesome recipe for Rocky Road! I made these last week to take to into work as we had our annual stocktake, which for anyone who doesn't work in retail, is a long and boring process. So I thought a little something to keep us going would be good. 

Until then I had never made rocky road...yes,yes I know how can I have never made it!? Well I wish I had earlier because one, it tastes amazing and you can put anything you like in it...two, it is super simple to do! So if you have never made it and need something sweet to help you get through the week then I suggest you give it a whirl...


Ingredients
  • 100g Unsalted Butter
  • 300g Chocolate ( I used half milk / plain)
  • 2 tbsp Golden Syrup

This is the base for all the other goodies you can add in...this next part of the recipe list is a real rough guide to what I added but by all means get creative a chuck in whatever you want! Any type of biscuits would work, salted pretzels would be awesome or maybe some gummy sweets instead of marshmallows...

  • Half a packet of Rich Tea Biscuits
  • A Handful of Dried Cranberries (traditionally glace cherries are used but I detest them!)
  • One packet of Malteasers / One Crunchie bar
  • Roughly 75g of Mini Marshmallows


Let's bake!
  • Break up the chocolate into small pieces and place in a heatproof bowl over a pan of simmering water along with the butter and the golden syrup. Make sure the bowl isn't touching the water.
  • Heat gently until you have a gorgeous pool of molten chocolate.
  • Once melted take off the heat and crumble in the biscuits along with the other ingredients.
  • Stir until each piece is well coated, if there seems like too much chocolate left then add in a few more ingredients. 
  • The mix should mostly be all the good things you have put in, you want a bite of everything not just chocolate...
  • Tip the mix into a foil lined deep rectangular tin. 
  • Leave to cool slightly to room temp and then pop in the fridge to solidify.
  • Once solid take out and carefully remove from the foil, cut into squares as big as you dare!
  • This keeps best in the fridge in an airtight container.


Oooh how good does it look!! And it tastes just as good too, which is why there is now none left and after writing this post I may need to go make some more...have a good week friends! x


all images copyright littletree designs
***

Thursday 4 July 2013

littletrees' photoshop tips...brush presets


This tutorial is a first for me, I am by no means a Photoshop genius...But I saw this pin the other day and immediately went into Photoshop and started experimenting with what else I could do with the Brush Presets. It still amazes me that after all these years I am still learning new and different things to do in Photoshop.

The results were so good I put together a little 'how-to' page to save in my files so I didn't forget them later. Whilst doing this I thought why not share it with you, my lovely blog readers...so you can have fun experimenting too! All of these tecniques were achieved using a simple round brush shape. Have fun exploring your Photoshop brush presets, I would love to know if you make some crazy brushes! xx


copyright Littletree Designs


***

Wednesday 3 July 2013

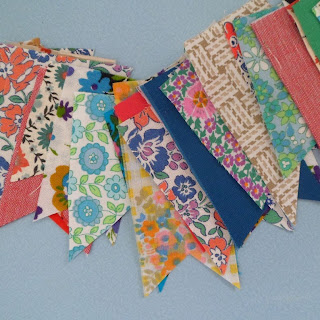
littletree makes...scrap fabric bunting

all photos in this post taken by me

A super simple, easy peasy make for you today friends...but first I have to thank my Nan for being a fabric hoarder, otherwise I wouldn't have all these wonderful retro fabrics at my disposal!

This make really is so easy it barely requires instructions but I have added a little step by step of how I did this below anyway... I also thought if you didn't have fabric you could use doilies which would look just as pretty or patterned papers. 


You will need...

Lot's of fabric scraps cut into whatever bunting shape you choose.
Bias Binding or Ribbon.
Needle and Thread.


Arrange the bunting in an order that is pleasing to you, take into consideration how the colours and patterns mix.  


Layout the bias binding/ribbon on the floor and place your bunting down in the order you have chosen.

Fold over the binding/ribbon sandwiching the bunting in the middle, pin the shapes in place.

Using a basic running stitch start at one end and get sewing! I did this one evening in front of the tv...
And that's it! Simple...


***

Monday 1 July 2013

meet Roberta!

 Left: Roberta and Aggy  //  Right: Roberta inspecting the camera


Happy Monday guys 'n' gals...say hello to our newest chicken, Roberta! Now you may have noticed that Roberta is 'slightly' larger than our other chooks...this is because she was one of our neighbours chickens and is a different breed to our Bantams. She has a sad back story...last sunday night her friends met an untimely end at the jaws of Mr Fox...she was the only survivor. 

My neighbour decided not to get any more chickens and asked if we would take her. At first we were unsure how our little chooks would take to a new friend but after the pecking order was established they seem to be getting on just fine! Now you may remember that all our other chickens have 'A' names but as our neighbour doesn't name his chickens we decided to name her after him...Rob therefore became Roberta!

Hope you all have a good week and just because here are a few more chook photos...x
 

what have we all spotted?

the cat!!


***
Related Posts Plugin for WordPress, Blogger...